How to use Yoink as a clipboard history app
Do you have any situations where you copied 1 and copied 2 from Mac and you needed 1 again? At times like this, I really want the keyboard clipboard that I used in Galaxy. However, the clipboard app that can be used in Mac is a subscription type, so I used to use Mac uncomfortably. But don't worry after reading this, you will be comfortable!!
I recommend an app called Yoink! It's a paid app, but it's also useful other than clipboard. First, I'll show you how to use yoink as the clipboard app. Launch the yoink app and enter preference.

You can click the circle next to the runner and go into the setting.
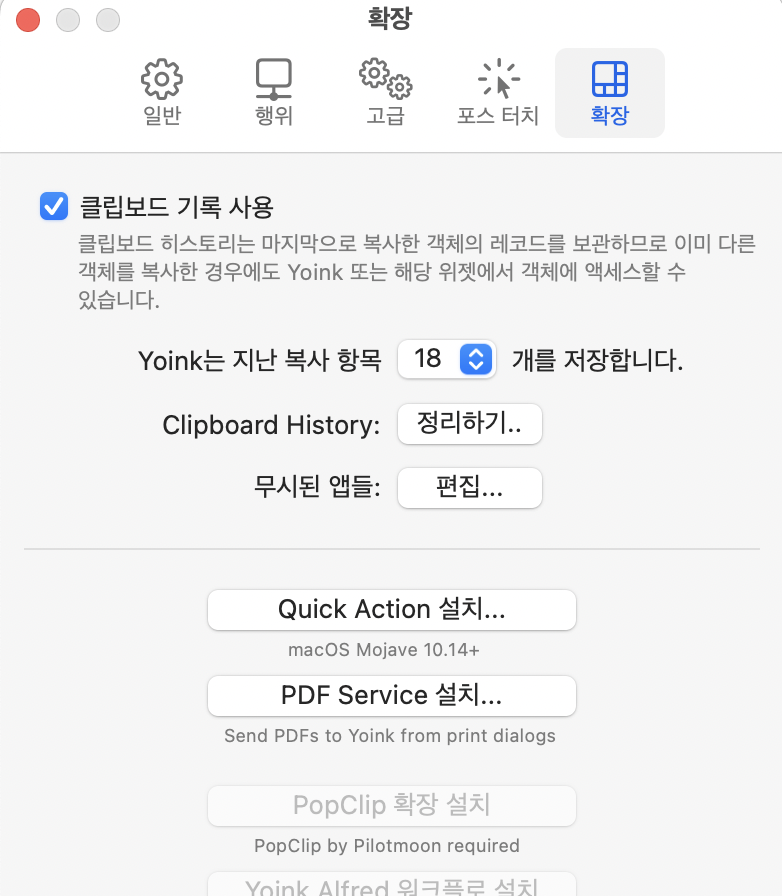
If you're in, check the clipboard history!
I checked that I will save 18 pieces, but I support up to 36.

Please set it up as much as you need and add Yoink Clipboard History in the Mac Widget
then

There will be a window like this. One clipboard history is an earlier clipboard history each.
If you fill it up,

It looks like this, the Notes and Microsoft Edge below, is a record of where I copied it.
I often use the "Copy the picture of the selected area to the clipboard" function as command+shift+4 to write this blog post, and if you capture the image like that, the name changes depending on where you capture it.
The part below that says Notes is a copy of the text in the Memo app to show you, and the part that says Microsoft Edge is a copy of the browser's image to the clipboard for blogging.
It's really simple to use what's in clipboard history, you can just click on the part you want to use. Then, the item is automatically moved to my current clipboard and can be pasted.
That's how I used Yoink as a clipboard app, and from here on, It's a more comfortable way to use yo-ink.
The method I showed you earlier was to go to Widget and paste, but in the case of a file, not an image or text, it can be troublesome to copy and paste one. It's not convenient way to use it.

This is a way how to use Yoink's built-in box.
If you look at the Yoink description picture, you can see the image of dragging the file and putting the file in a box.
But I thought it was so uncomfortable to just drag and put the file somewhere using the trackpad, so I came up with it.
First, you need to set two settings.
1. Go into the Yo-ink setting.
2. Check Show icon in Settings-General-Menu bar

3.Go settings-Acts-Yoink Automatically Display
4.Customize the 'show yoink display manually' shortcut to a convenient shortcut
5. Change option to 'Show yoink when dragging to the edge of the screen' (this is a preferable option)

If you've done it up to here, you've finished setting up the first one, and now it's
1. Go to Settings-Keyboard-Shortcut Key-Service

2. Customize the shortcut for the 'Add selected file to Yoink'
If you did it up to here, great job!
Now you can imagine roughly. If you've come this far, there are three ways to put files or text in a yoink box.
1. Drag the file to the edge of the screen and insert it directly into the box
2. Drag and insert the file directly with the yoink circle on the top menu bar
3.Select a file and insert it as a shortcut (you can select multiple files and insert them)
If you do it up to here, the Yoink box will be 'always' at the front of the screen. Until I empty all the Yoink boxes

You can now use the shortcut 'show the yoink manually'.
When you contained the file, the Yoink box will appear at the front. At this moment you can press the shorcut of 'Show Yoink manually'. And then the box will disappear.
If you need a box, press the shortcut 'Show Yoink manually' key again to make it visible.
This makes yoink a great clipboard app to manage your files! Haha
The End!!!
'기타 > 지식' 카테고리의 다른 글
| [자바다] static 정적 변수와 final 필드 그리고 싱글톤 선언하는 법 (0) | 2022.08.16 |
|---|---|
| [자바다] Target, Method[] 등 어노테이션 관련 cannot be resolved to a variable 에러 해결 (0) | 2022.08.11 |
| 맥에서 쓰기 좋은 클립보드 히스토리 앱 - yoink 사용법 (0) | 2022.08.09 |
| [자동화] 네이버 사전이랑 파파고 바로 검색할 수 있게 해주는 맥 기본앱 (1) | 2022.08.09 |
| #23 '열혈 C 프로그래밍'에 대한 소회 (0) | 2022.08.08 |